
Payroll Back Up: Step-by-Step Guide
Organising your backups: using multiple Flash drives
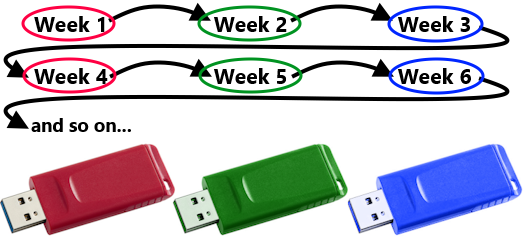
An easy way to keep track of your backups is to have several flash drives, for example, a red one, a blue one, and a green one.
Alternatively, you could have them all the same colour and label them #1, #2, #3, etc.
Make your backup to the red one in the first week, then the green one the next week, then the blue one the week after.
In the fourth week, back up to the red one again. This will overwrite the previous backup on the red drive.
Continue this way so you will always have the last three week's pay runs backed up (or more if you want to use more drives).
If you process payrolls for more than one business (for example, "ABC Ltd" and "XYZ Systems"), use a separate set of flash drives for each - if you don't, you will overwrite (delete) the previous backup. Ensure you carefully label the drives if you do this.
The above suggestion means you will leave the "Path" name blank in the instructions below. Many people find this easier, especially if they need to restore the data from the backup. Technically, this means the backup file (which is called 1.BKP) is saved in the root directory of the drive, and you don't need to search through folders to find it if you need it.
Organising your backups: using folders
Alternatively, you can put multiple backups onto a single flash drive. You can use just one flash drive. However, we do recommend using more than one in case the flash drive fails, is lost, or is damaged. You might back up twice (once onto the first flash drive, and once onto another), or alternate from week to week between different flash drives. Whichever works best for you.
This means creating a folder with a different name for each backup. A good idea is to base the name on the date of the backup or the pay date. For example, a backup for "ABC Ltd" after the pay of 8 May 2024 might be given the folder name ABC20240508. This means the backup file (called 1.BKP) will be placed in that folder. Next week you might use the same flash drive, or another flashdrive, and use ABC20240515 as the folder name. The folders will build up, but modern flash drives have a lot of space.
Very IMPORTANT!
Sometimes folders are called directories. So if you see "folder" or "directory" it means the same thing.
The words "flash drive", "USB stick", and "memory stick" are all used for the same thing.
You can back up to an external hard drive instead of flash drives if you prefer. In that case, you should use a different folder name each time.
Where you see "Path" below, this is the folder name (directory name). Sometimes you might see a back slash (\) at the start and end. For example \ABC20240508\. You don't need to put the back slashes in when backing up, but it is ok if they are there.
If required, you can have folders within folders (subfolders) separated by back slashes. For example: \PayrollBackup\ABC20240508\. The back slashes are shown in red \ to make them easier to see in the example. In this example, there is a folder called PayrollBackup, and within that, there is a subfolder called ABC20240508. However, this is not commonly needed.
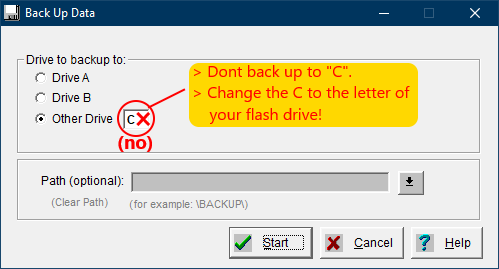
Do not back up to C drive! That is usually where your live data is. If your C: drive fails, you will lose your live data AND backups.
When you plug in your flash drive, Windows will assign it a letter. For example E or F etc. Windows might give it a different letter each time, depending on what else is plugged into the computer. Ensure you check the letter that Windows assigns, and enter that letter into the backup program - see step 3 below. For example, if you see "C" in the box, then you know you need to change what is in the box:
Step 1
From Payroll Pro, select "Backup",
then choose "Make a Backup" 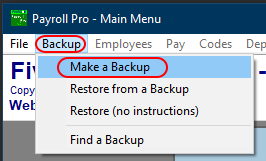
Step 1a
You will now see the list of payrolls.
You might be processing payroll for several businesses, in which case the list might include a few to choose from.
The top one will be highlighted to start with—this may not be the one you want to backup, so carefully select the one you want to backup from the list.
Step 2
The Backup utility will now appear.
Click on the BACKUP button.
Step 3
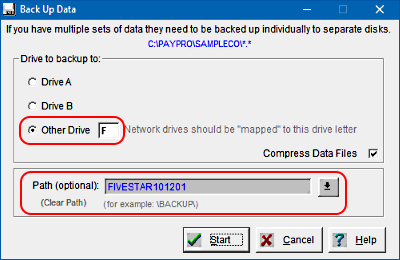 We advise using an external device for your backups - for example a flash drive.
Enter in the drive you wish to back up to. If you are unsure which drive your memory stick is in look under ‘my computer’. It is often listed as an external device.
As mentioned aboved, you may or may not want to use the "Path" option (See organising your backups at top of page for details).
If you do want to use this...
Type in the path name that you wish to call your backup. This could be a short version of your company's name and the date. It is helpful to put today's date at the end of the backup path for example fivestar101201 - this way it is easy to find the exact folder to restore from should this be required. Only use alphanumeric characters, no spaces, dashes, or slashes. It may be even easier to use a shorter name - eg FS101201
Payroll Pro will remember what you have previously used so this will remain in the program. In future you need only change the date. BUT PLEASE check the "Other Drive" letter EVERY TIME YOU BACK UP and ensure it is the backup drive you wish to back up to. If it is C then you will probably want to change it since C is your hard drive, and backups made to your hard drive are of no use if your hard drive fails!
Click on the “start” button to begin the backup.
Step 4
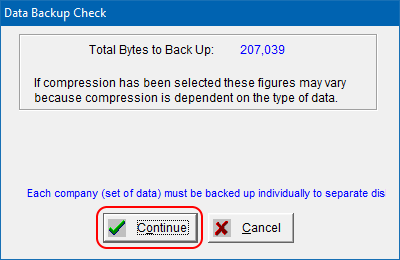
You will now have a screen that shows you the total bytes that will be backed up.
You can fit a large number of backups on one memory stick.
Click on 'continue' to start the backup.
Step 5
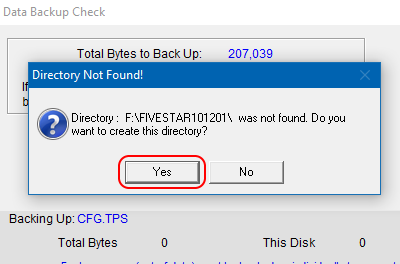
By entering the date as part of the name, you are creating a unique folder name (directory name), which means folders and files will not be overwritten (deleted and replaced). The backup program will create the directory (folder) for you.
If you had only used your company name for backup purposes, or not entered any path at all, you will not be creating a new directory and your backup will be overwritten each time. This would be fine if you are making only one backup per flash drive (See organising your backups at top of page for details).
Complete!
You have now completed your backup.
If you were to look in your backup directory (folder) you would see a file called 1.bkp ![]()
This is a special backup file that cannot be opened unless it is restored through Payroll Pro.