Restore Data in Payroll Pro
Backups made from Payroll Pro create a single file called 1.BKP.
This file 1.BKP is saved to the disk drive and folder which you select at the time of
making the backup.
For Example: E:\AB100525\
You would usually only need to restore your data in cases such as file corruption or when
moving Payroll Pro to another computer.
Please see "THE RESTORE PROCEDURE" below. This takes you through all the steps required
when restoring data, and explains any messages which might appear during the process.
If you are having trouble locating the backup file during the restore process, then the steps below will help with this. Usually it is just a matter of knowing or finding the drive letter of your memory stick, and the name of the folder you saved the backup into.
The backup will also record the location of the original data.
If you are not restoring to the original folder name you may get some extra warning
messages. This is explained in PART B "Restoring to a different location".
For any other messages please see PART C "Other Messages".
Note - If you have backed up by simply copying your folders to a storage device instead of using the Backup Utility in Payroll Pro, please click here for instructions.
BEFORE STARTING - If you are restoring data onto a new computer
If you are restoring your data onto a new computer, you will first need to install Payroll Pro, then restart your computer and run Payroll Pro and enter your licence key.
Once Payroll Pro is installed you will need to create a blank set of data to restore into. You can do this quickly by selecting FILE then CREATE A COMPANY from the main menu in Payroll Pro. If you can remember and use the folder name you had on the original computer then this makes the restore process a little bit quicker, but it is not essential.
If at any point you are asked for a company registration code - don't worry - just ignore this as the registration code is restored back with your data.
PART A - THE RESTORE PROCEDURE
- Select FILE then BACKUP/RESTORE, then select your payroll folder (this is where the restored data will go to)
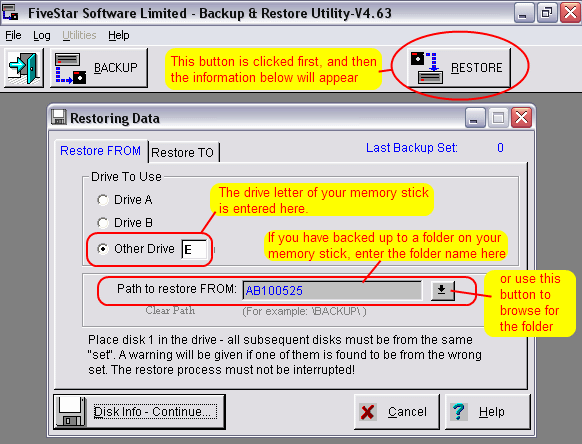
- The Backup program will now appear. Select the RESTORE button at the top right of the screen. On a wider screen this may be nearer the top middle.
- Answer OK to the confirmation prompt.
- A screen similar to the following will now be showing:

- In most cases all you will need to do is to enter the drive letter (E in the example above).
If you backed up the payroll into a folder by originally entering a path (for example AB100525) then you will need to enter that path in the box labelled "Path To Restore From", otherwise the path can be left blank. You can use the button beside the path to locate the folder on your memory stick.
You would then click "Disk Info - Continue".
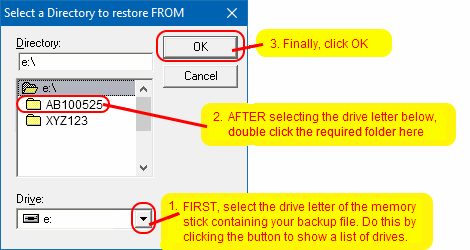
However, please continue reading below before starting. - If you use the button
 to browse for the folder name, you will see a window similar to the following. Select the drive first, then locate the folder name from the list. The drive could be any letter that your computer gives it. After double clicking on the folder on the memory stick, click OK and the path will be filled in automatically for you.

- If you have any problems with the step above, you could use "My Computer" (or "Computer" in Windows Vista and higher) to find the folder name, and then type it in to the box.
- You can now click on "Disk Info - Continue...", and then on the "Continue" button.
- If you are restoring onto a different computer, or into a different folder name you may get a warning message saying
"The Restore Path does not match the Path of the Backup"
- this just means you are restoring to a different place - see PART B below for what to do here.
- Otherwise just click the "START" button. The restore process will now begin.
If you receive any other messages, please see PART C "Other Messages" below.
- Click OK when complete.
PART B - RESTORING TO A DIFFERENT LOCATION
For example, your original data may have been in C:\PayPro\XYZDATA, and you are restoring
into C:\PayPro\ABCDATA
A warning message may appear: "The Restore Path does not match the Path of the Backup"
In this case:
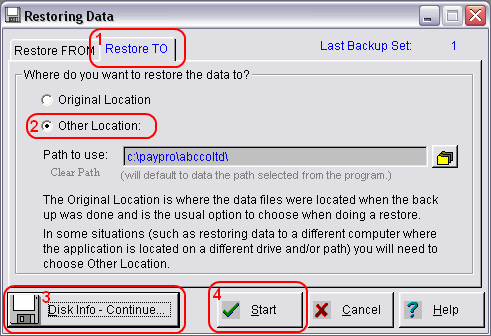
1. Click the RESTORE TO tab (you might have to click a "Continue" button first)
2. Click "Other Location"
2a. The "Path To Use" will be filled in automatically for you so do not change this yourself.
3. You can now click on "Disk Info - Continue...", and then on the "Continue" button.
4. Click "START".

If you receive any other messages, please see PART C "Other Messages" below.
PART C - OTHER MESSAGES
"Warning - Disk Set Older Than Current Data!"
This will display some information about Disk Set Numbers and Sequence Numbers.
This just means that you may have made another backup of the same data at a later date.
If you are sure that this is the backup you want to restore from, then just click OK, and
the restore will continue as normal.
You can always restore from a different backup afterwards if you want to.
"Bring Set Numbers Into Sync?" or "Do you want to Synchronise set numbers?"
Answer YES to this.
