
Entry of Days and Hours worked (and Holidays and Leave)
- entering all on one line
This defaults to show all days in the pay period but can be setup to enter all hours in one line
If you do not wish to enter the hours for each individual day, you can enter these into one line (with the option to add more lines for leave or department splits) as follows. The first section is a quick summary. If you would like to see screen shots please see Instructions With Screenshots below.
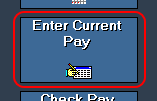
- Go into "Enter Current Pay".
- Select an employee.
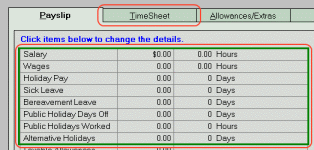
- Go into the TimeSheet.
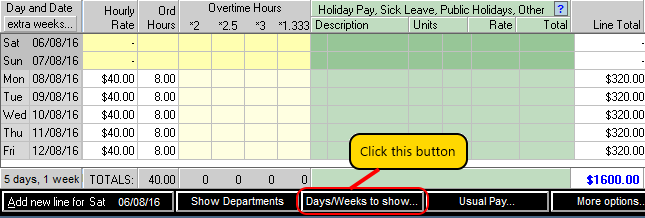
- Click “Days/Weeks to Show” underneath the day-by-day grid.
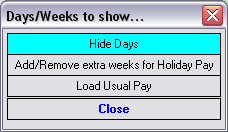
- Select "Hide Days", and then click Yes to confirm.
- If you want to add another line or more, click “Add New Line”.
- Note however, that in most cases, especially where the employee works regular hours, you should not need to “hide” the days
since these will be filled in automatically for you each pay period, and you would only need to make changes if leave is taken or
the hours are different from the regular hours. - Note also that if you do choose to hide the days for employees who work irregular hours, you will need to verify the number of days
worked on for the purposes of calculating the average daily pay when the employee takes sick leave, bereavement leave or a public holiday. You may also need to verify the number of weeks covered by the pay. - When you have finished entering the pay details, click "Save" as usual.
- You may be asked to verify the days covered and the period covered.
- Or if this is for some additional weeks such as a close down for Christmas, you can click on the "Days for Gross/Period Covered Box" just above the "View Payslip Button". From there, tick "Override weeks", and enter the number of weeks the pay is for. If applicable, also enter the number of days for gross (which is only used to calculate the average rate for sick leave for employees who do not work regular hours).
- Repeat for each employee from step 2.
To change back to showing the days:
- Go into "Enter Current Pay".
- Select an employee.
- Go into the TimeSheet.
- Click "Days/Weeks to Show" underneath the day-by-day grid.
- Select "Show Days".
- Click "Save" as usual.
- Repeat for each employee from step 2.
Instructions With Screenshots
- Go into "Enter Current Pay".
This is found on the main menu.
- Select an employee.
Just in the usual way.
- Go into the TimeSheet.
Click the "TimeSheet" tab or anywhere in the area shown in the red box as indicated below.
- Click “Days/Weeks to Show” underneath the day-by-day grid.
- Select "Hide Days", and then click Yes to confirm.
- You will now see something similar to:

- If you want to add another line or more, you can click “Add New Line”.

You would then see a second line.
- So for example, maybe you are entering 3 weeks of holidays and a couple of public holidays:

Note that there are no hours entered in this example. You could enter hours also if you need to.
- Note however, that in most cases, especially where the employee works regular hours, you should not really need to “hide” the days
since these will be filled in automatically for you each pay period, and you would only need to make changes if leave is taken or
the hours are different from the regular hours.
- Note also that if you do choose to hide the days for employees who work irregular hours, you will need to verify the number of days
worked on for the purposes of calculating the average daily pay when the employee takes sick leave, bereavement leave or a public holiday. You may also need to verify the number of weeks covered by the pay.
- When you have finished entering the pay details, click "Save" as usual.
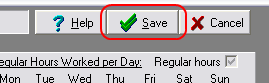
- You may be asked to verify the days covered and the period covered.
- Or if this is for some additional weeks such as a close down for Christmas, you can click on the "Days for Gross/Period Covered Box" just above the "View Payslip Button".
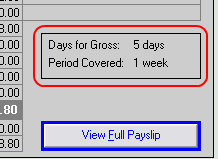
- From there, tick "Override weeks", and enter the number of weeks the pay is for. If applicable, also enter the number of days for gross (which is only used to calculate the average rate for sick leave for employees who do not work regular hours).

Click Yes to confirm.
- Repeat for each employee from step 2.