
Screen shots - Payday Filing
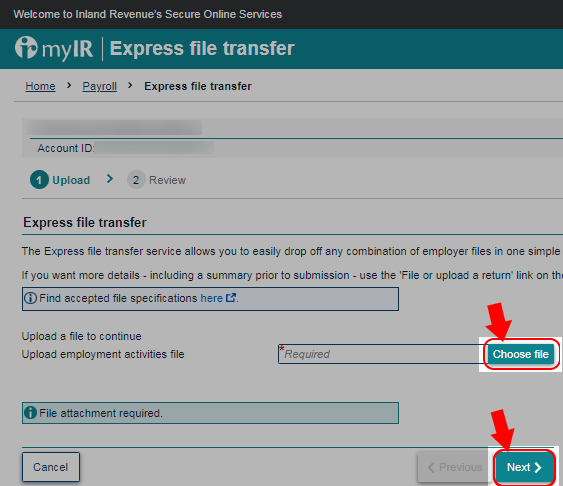
Step 7:
Choose the File and Upload it.
Note that this area relates to the IRD's website - please contact IRD if you have any problems with this part.
You will see a Choose File button - click this. Note that this might sometimes show as Browse....
After you have selected your file, click Next >.
Further below on this page is a hint about easily selecting your file...
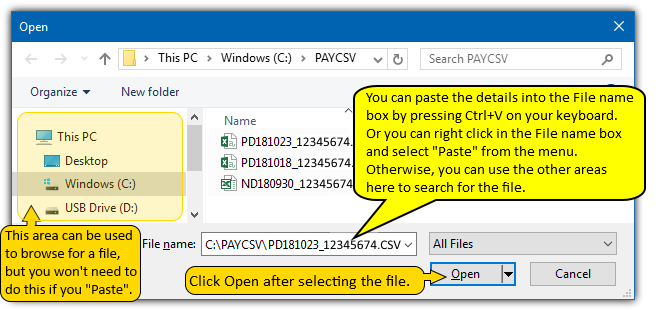
(Step 7 Continued) HOW TO SELECT YOUR FILE QUICKLY AND EASILY
After you click Choose File, you will see the Windows "Open" box.
If you have just created the file in Payroll Pro, then the name and location will be in your Windows Clipboard!
You can simply "Paste" this into the file box.
In Windows, "Copy and Paste" is a well-known term. You "Copy" something by highlighting it, then using Ctrl + C, or by right clicking the highlighted text with your mouse and choosing "Copy" from the pop-up menu. In this case (with the payday filing file), Payroll Pro has already done the "Copy" part for you.
So, in the "File Name" box, you can press CTRL + V (paste) from your keyboard to paste the location and name of the file into the "File Name" box.
Alternatively, you can right click in the "File Name" box with your mouse, and choose "Paste" from the menu which pops up. Otherwise you could type in the full location and file name (which is on the printed report from Payroll Pro).
If you cannot remember or find the details and the paste option does not work, you can create the file again. IF YOU DO CREATE THE FILE AGAIN be sure to "replace" the file instead of creating an amendment.
Note that the file name will be PDyymmdd_nnnnnnnnn.CSV, which is the date (yymmdd) followed by the employer's IRD number (nnnnnnnnn). Or if this is an amendment, PDyymmdd_nnnnnnnnn_AMENDED.CSV. The PD is just short for PayDay.
Then click Open.
You can click anywhere on the image below to see the next step.
Step-0 Step-1 Step-2 Step-3 Step-4 Step-5 Step-6 Step-7 Step-8