
PAYROLL PRO TUTORIAL
Setting up your Payroll and Processing Pays
Page 1: Creating a Company, and General Setup.
The following assumes you have installed Payroll Pro. If you haven't installed it yet, you can download Payroll Pro from here.
After installing Payroll Pro...
Create a new set of blank data
1. If you have a licence key (and associated licence name) you can enter these when prompted.
Otherwise, you can continue by skipping through the prompts until you reach the following:
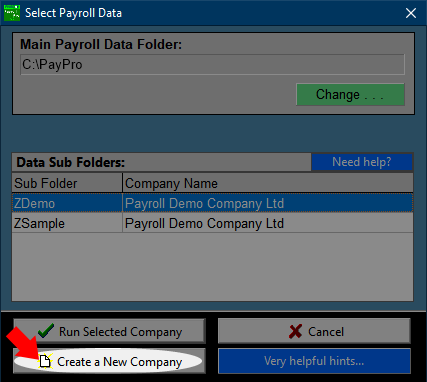
To create a new blank set of data, click Create a New Company.
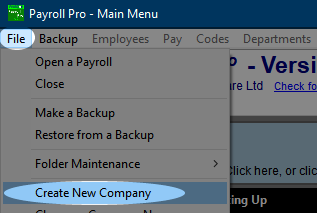
If you don't see this, you can instead click File > Create a New Company.
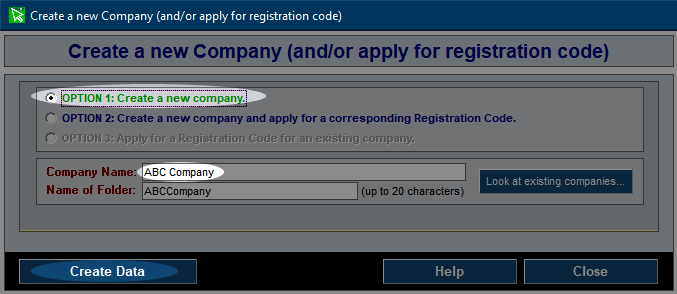
2. Next, click Option 1, then enter the company name.
The folder name will fill in automatically for you, but you can alter this if you wish.
Click Create Data.
You will then be returned to the main menu of Payroll Pro.
Various Initial Settings
Before continuing, we suggest entering some global settings.
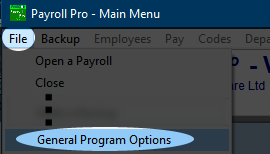
1. Click File > General Program Options.
You can come back to this and make changes later, but have a look at what is available now.
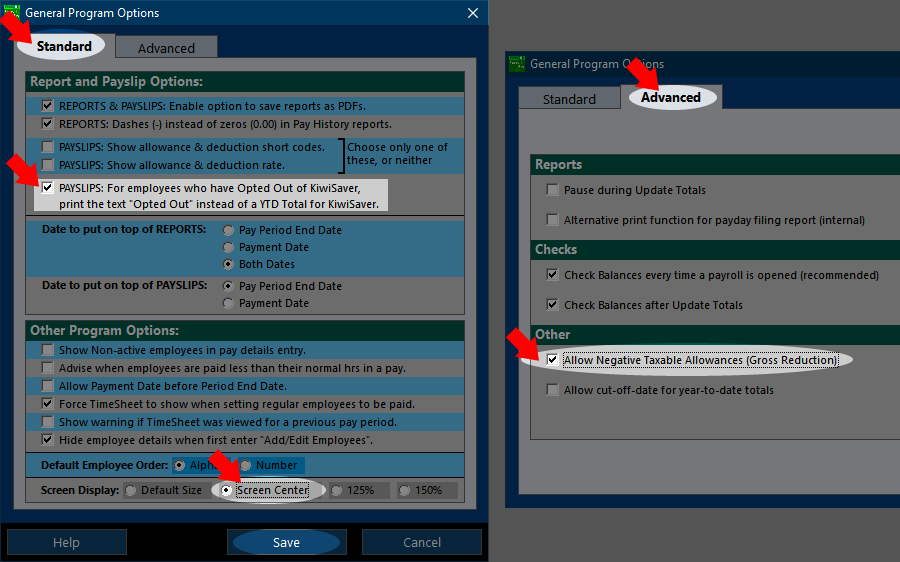
Popular settings are highlighted as shown below, and we recommend changing these now.
![]() Setting the screen display to Screen Center is beneficial if Windows should ever hide a report window behind the menu.
Setting the screen display to Screen Center is beneficial if Windows should ever hide a report window behind the menu.
Click Save.
Exit Payroll Pro and then restart it again for the screen display change to take effect.
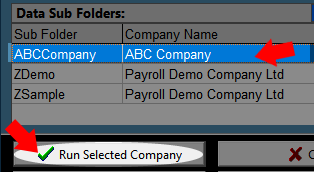
2. Back in Payroll Pro you will see the newly created company in the list. If you don't see the list, click File > Open a Payroll.
Double click to open, or click once to highlight then click Run Selected Company.
If you are asked to if you have a registration code, answer yes if you have one, otherwise answer no to the next one or two prompts.
3. You may see a bright green message regarding "Sick Leave Changes". This just refers to the change in sick leave entitlements to 10 days which came into effect in 2021. Click the message and then just click OK at the next two messages. You should now see the "Defaults & Setup Screen" showing. If you don't see this, click the Defaults & Setup button in the main menu.
![]()
4. Some of these settings should be set now, while others can easily be changed later.
Click each tab in turn and have a look at the information on each page.

Holiday Pay/Sick Leave
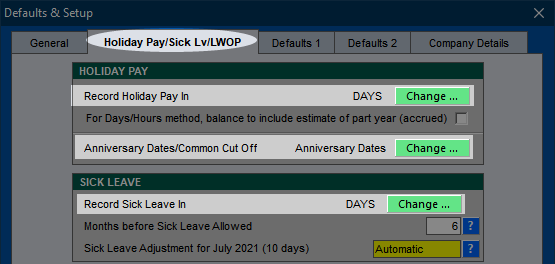
![]() In particular, it is important to set whether holiday pay and sick leave will be recorded in days or hours before setting up your employees.
In particular, it is important to set whether holiday pay and sick leave will be recorded in days or hours before setting up your employees.
For example, all permanent employees will have holiday balances in the same units (either days or hours), and it is not possible to have some in days and some in hours. Note that casual employees are not affected by this - their holiday pay balance will be in dollars only, and generally paid out each pay (pay-as-you-go holiday pay) usually at 8%. Likewise, all employees will have sick leave recorded in only days or only hours, and a mix is not possible. You can change from one unit type to another in future, but there is a lot involved in the conversion as it is not always a simply one-to-one change, so this will probably mean you will need to make manual adjustments to previous employee information. For Sick Leave and Holiday Pay you can use fractions of a day if required. For example 0.5 days or 0.25 days or any other fraction up to 2 decimal places can be entered. To be clear, holiday pay can be in one unit type (e.g. hours), and sick leave in the other (e.g. days).
The default for annual entitlements for Holiday Pay is the Anniversary Date (anniversary of start date). Employees (excluding casual employees) get another four weeks (or more if that is in their contract) of holidays on their anniversary date.
![]() **Note that if you need to use a common cut-off date for an annual shutdown period, click the button to change this. Check the Holidays Act to see if you are allowed to use a common date. If this applies to your situation, we suggest choosing a common cut-off date that will occur before the pay in which holiday pay is paid out each year, as this allows the holiday pay entitlement to be updated before the payment. For example for a shutdown of three weeks over the Christmas period, the common cut-off date entered into the payroll could even be near the start of December.
**Note that if you need to use a common cut-off date for an annual shutdown period, click the button to change this. Check the Holidays Act to see if you are allowed to use a common date. If this applies to your situation, we suggest choosing a common cut-off date that will occur before the pay in which holiday pay is paid out each year, as this allows the holiday pay entitlement to be updated before the payment. For example for a shutdown of three weeks over the Christmas period, the common cut-off date entered into the payroll could even be near the start of December.
**
The Holidays Act does allow for anniversary of start dates rather than a common cut-off date in a shutdown situation, where employees are paid holidays in advance, and this is squared up at the next anniversary (of start) date.
The relevant options for this are shown here.
The estimate of part year (accrued) option can be turned off or on any time without upsetting any data. Use of this is not part of the Holidays Act, and will depend on your company's policies. If you are not sure what this is, leave it unticked for now. Its use is really to give an estimate of how many days (or hours) an employee could take in advance without them ending up with a negative termination balance, which means they would essentially owe the business money when leaving. It does not always equate, because the 8% termination calculation does not necessarily have to equal the value of proportional days. Repaying a negative holiday pay balance on termination of employment can be difficult if provisions are not properly included in the employee's contract. Paying holidays in advance (using the accrued estimate) is not generally a requirement of the Holidays Act.
Defaults & Setup - Defaults 1 & 2
![]() When new employees are created it is helpful to have them created with common values to reduce data entry time. This will not affect information in existing employees as these default values are only inserted when a new employee is added to the payroll. And of course, you can change the information that is automatically filled in for employees.
When new employees are created it is helpful to have them created with common values to reduce data entry time. This will not affect information in existing employees as these default values are only inserted when a new employee is added to the payroll. And of course, you can change the information that is automatically filled in for employees.
When complete, click Save Changes. This will close the window and return you to the main menu of Payroll Pro.
Current Pay Period End and Payment Date
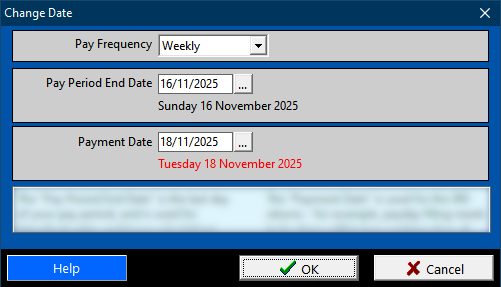
![]() It can be very helpful to enter the dates for the first pay run that you will process in Payroll Pro before any further setting up. Here's an example where the pay periods are weekly, and run from a Monday to a Sunday, and the employees are paid on the following Tuesday. The first pay run will have a period end date of Sunday 16th November, with payment date Tuesday 18th November.
It can be very helpful to enter the dates for the first pay run that you will process in Payroll Pro before any further setting up. Here's an example where the pay periods are weekly, and run from a Monday to a Sunday, and the employees are paid on the following Tuesday. The first pay run will have a period end date of Sunday 16th November, with payment date Tuesday 18th November.
Select Change Date.

Choose a Pay Frequency (Weekly in this example), then the Pay Period End Date and Payment Date.
For a mix of pay frequencies, there are several ways to go about this. You could run two separate pay runs - one for each frequency. For example, monthly and weekly. Or you could select "All Frequencies" - this is fine for a weekly and fortnightly mix, but not recommended for weekly and monthly mixing.
Finally click OK.
There are one or two help buttons here - try clicking these for a little more detail.
Click here to move to the next section, where you will learn about setting up departments, allowances, and deductions.
![]()