
PAYROLL PRO TUTORIAL
Page 2: Setting up Departments, Allowances, and Deductions.
Departments
Your payroll data will come set up with the ADMN (Administration) department, but other departments can be added. If you do not want an ADMN department, then this one can be deleted. At least one department must be defined at all times, so if you want one department only which is not ADMN, then add the new department and then delete ADMN.
When you first see this option, the ADMN department will be showing. If this is all you want (for example if you are not allocating to separate departments), you can ignore this section. Or, if you want to change the name, continue below.
During initial setup of the payroll, a pay history can be manually entered. However, an easier option is to leave the department pay history until after you have entered employees with their individual Pay Histories, after which you can have the department pay histories automatically created using the employee histories.
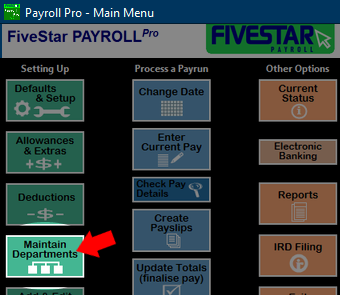
To add other departments or maintain department information, select Maintain Departments.
1. Adding a new department
Click New.

A blank record will appear. You can enter a code for the department of up to four characters, and a name. The code cannot be changed later, but the name can be changed at any time.

In the majority of cases you will not need to add a pay history, so there is nothing else to do, and you can click Keep New or Save - both will have the same affect.
![]() If you are setting up an existing payroll with historical figures, the pay history can be manually entered now, however, an easier option is to leave the department pay history blank for now. Then, after you have entered employees with their individual pay histories, you can have the department pay histories automatically created using the employee histories.
If you are setting up an existing payroll with historical figures, the pay history can be manually entered now, however, an easier option is to leave the department pay history blank for now. Then, after you have entered employees with their individual pay histories, you can have the department pay histories automatically created using the employee histories.
2. Changing the details of an existing department
Select the department from the list which appears when you first enter this option, or click Search to locate the department you wish to alter. You can type in the code and press enter (on your keyboard), or select from the list and click OK, or just double click the required department directly in the list.

Usually it will just be the name you will be changing, so change this, then click Save.
Click Exit to return to the main menu.
![]() For more information click here.
For more information click here.
Allowances (or Extras)
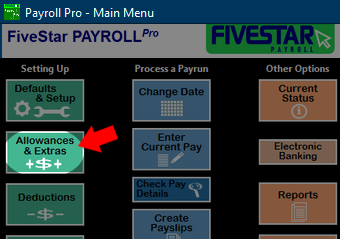
These are set up (defined) in the Allowances & Extras option.
The data will come set up with a selection of these, which you can have a look at to get an idea of what options are available. You can change any of these if you need to, but ensure changes are made before using them, as once they are in use, some of the fields cannot be changed. However, it is easy to create more codes (e.g. BON2 for another bonus code, and so on).
A.C.C. (ACC)
This has a default type of 80% of the hourly rate. This means that when you use the ACC code in an employees pay, it will default the rate to 80% of the employees hourly rate, and you can then enter the number of hours as the units. The total will then automatically calculate as the number of hours times 80% of the hourly rate.
Information about ACC and its relationship to sick leave can be found on the employment NZ website:
www.employment.govt.nz/leave-and-holidays/sick-leave/managing-sick-leave
or you can just go to www.employment.govt.nz and search for ACC.
Back Pay (BACK)
Back pay is taxed at a flat rate (as per the requirements of the IRD) in the same way a bonus would be taxed. You can set up other "Back Pay" codes if you need something a bit different. For example maybe you might want to distinguish back pay for leave as opposed time worked, so you might have the same settings, but call it BKLV for Back Pay (Leave).
Bonus (BON)
The BON code comes set up as a flat taxable allowance which is excluded from holiday pay calculations. This is the general set up for an allowance which is irregular or discretionary. For a regular or non-discretionary payment, other rules can apply, and usually they will have to be included in holiday pay calculations. You can set up other bonus types (e.g. BONR for Regular Bonus, etc) with settings which apply to individual cases. Please seek advice if you are not certain what applies.
Commission (COMM)
The settings here may or may not apply to your situation. You can edit the existing COMM details if you like, but do this before using the code to pay any employees.
Settings - summary
![]() Be sure you know the details of the allowance types you are setting up. For example, does it need to be taxed at a flat rate? does it need to be included in holiday pay calculations? If uncertain, some sources are your accountant, IRD, or MBIE.
Be sure you know the details of the allowance types you are setting up. For example, does it need to be taxed at a flat rate? does it need to be included in holiday pay calculations? If uncertain, some sources are your accountant, IRD, or MBIE.
Code - up to 4 characters. Cannot be changed after setting.
Name - this can be edited anytime.
Taxable/Non-taxable - selecting non-taxable will remove all of the fields which are only applicable to taxable allowances.
Negative (Gross Deduction) - Allowances with this option selected will reduce the gross taxable amount, so use carefully. See here for more about this.
Default Type (unit rate) - Whatever is selected here, you can still override it when paying the allowance. If the amount will vary between employees, select flat amount and enter 0.00.
Is a type of leave or paid time away from work - Since Holiday Pay, Sick Leave, Bereavement Leave, Public Holidays and Alternative Holidays are taken care of separately by Payroll Pro, then you would not usually need to use this option.
However, if you do need to define another type of leave or a code representing paid time away from work, then tick this box.
Show in holiday and leave record report -
Tick this box if want employee totals for to this code to appear in the holiday and leave record report.
Reset to zero after employee paid - selecting either or both of these eliminate accidental re-use of one-off allowances & extras in subsequent pay runs.
Add Earner Levy - (For taxable allowances & extras only) -
In nearly all cases this should be ticked. However two types of allowance that are exempt from earner levy are redundancy and retirement payments.
Lump Sum Payment (flat tax rate) -
A special formula provided by the IRD will be used for this code to determine what the flat rate should be.
For Holiday Pay and Leave Calculations, Include in Gross for - In the majority of cases these options should be ticked. Examples of when these would not apply is for an allowance which is irregular or discretionary, and also retiring allowances. Changing these two settings will not affect previously calculated totals – it will only affect totals calculated from the next pay run onwards. If unsure refer to the Holidays Act 2003, at least sections 8 and 9.
Include in Gross for KiwiSaver - The definition of salary and wages now excludes redundancy payments and some accommodation benefits. In addition, Compulsory Employer KiwiSaver Contributions are not required when an employee is getting ACC or paid parental leave payments, although you may choose to make them.
Due to this, the following options are available:
Include in Gross for KiwiSaver – Employee Deductions
Include in Gross for KiwiSaver – Employer Contributions
These will automatically be unticked for the code "RED" (Redundancy), but can be manually changed for other allowances.
WARNING - Take extreme care if turning this off for any taxable allowance or extras – turn this off only for those items legally exempt from KiwiSaver.
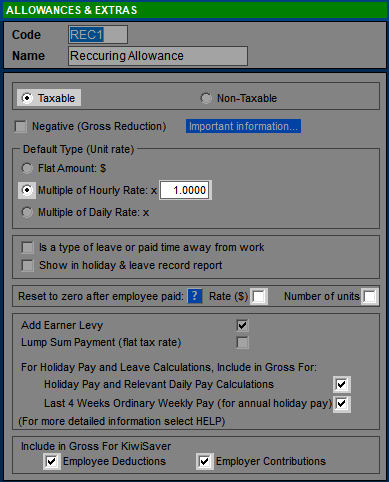
Here's an example of a taxable allowance which is to be paid each pay at amount related to the employees main hourly rate. It has the unimaginative name of "recurring allowance". Note in particular the Default Type (Multiple of Hourly rate x 1), and Reset to zero (both options cleared). It's a regular payment and non-discretionary, so the Holiday Pay options are selected. It's a taxable allowance, so as with almost all gross pay types, will be included in the KiwiSaver calculations - Include in Gross For KiwiSaver.
Deductions (after tax)
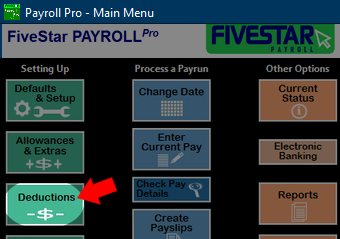
These are set up (defined) in the Deductions option.
There are no predefined deductions except for two that are used in the background by Payroll Pro - SLCIR and SLBOR. You can ignore those two for now.
![]() Note that you cannot currently attach a bank account number to a deduction, so if any deductions need to be paid to another party, you will need to pay these to the relevant payee outside Payroll Pro.
Note that you cannot currently attach a bank account number to a deduction, so if any deductions need to be paid to another party, you will need to pay these to the relevant payee outside Payroll Pro.
Settings - summary
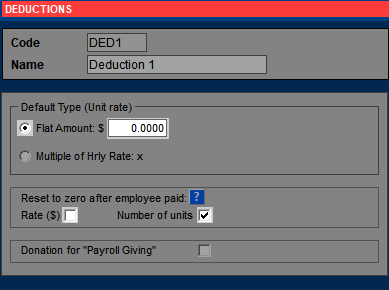
Code - up to 4 characters. Cannot be changed after setting.
Name - this can be edited anytime.
Default Type (unit rate) - Whatever is selected here, you can still override it when paying the allowance. If the amount will vary between employees, select flat amount and enter 0.00.
Reset to zero after employee paid - selecting either or both of these eliminate accidental re-use of one-off deductions in subsequent pay runs.
Donation for
Payroll Giving - If your business offers the "Payroll Giving" scheme for your employees and the deduction is a donation to a charity, for which employees are liable for a donation tax credit, you can select this option.
Please see IRD's website for more information.
Here's an example of a deduction which is paid periodically, where the amount is to remain the same, but the number of units are set to zero after each pay so that it is not accidentally deducted each pay. Note in particular Reset to zero - only Number of units is cleared.
Click here to move to the next section, where you will learn about setting up employees.
![]()