
PAYROLL PRO TUTORIAL
Page 3: Setting up Employees.
Select Add & Edit Employees. Here, you can add new employees as well as editing details for existing employees.
Click New to begin adding a new employee. A new employee record will be created, and will be assigned the next free employee number. You can change this number now if you need to, but not after the record is saved.
Various Personal and IRD Fields
![]()
Required fields are as follows, but we recommend you fill in as much as you can now.
Surname and First Names.
Alpha Key.
Will be filled in automatically, but can be changed any time required.
Department. Requires a code even if you don't use departments.
IRD Number. If this has not been supplied by your employee, you can leave it as zero, and use the ND tax code
Tax Code. As supplied by your employee.
Pay Frequency. You can have a mix of pay frequencies between different employees.
Start Date.
Clicking the Start Date box allows you to enter the start date as well as KiwiSaver settings. Comprehensive instructions are included on the screen for this section.
KiwiSaver. You will have entered this above, but can see the same information here all in a single window.
Main Hourly Rate. For a waged employee, click on the box, and then enter the hourly rate here with up to four decimal places. If you come back to this screen later and find you cannot change or enter the rate, you can still edit this later under "Enter Current Pay".
Annual Salary. If the employee has an annual salary, click the box and enter the annual salary. As with the
hourly rate (explained above), you can also edit
this under "Enter Current Pay".
Regular hours for each day of the week are set up later, under "Enter Current Pay".
Pay History
![]()
The Pay History will be blank to start with, and if this employee has just started employment, then nothing needs to be done here. A new pay history entry is automatically created when each pay run is processed (i.e. finalised using Update Totals).
![]() Otherwise, it is important to enter any history now, before processing pays. The year-to-date (YTD) totals for the IRD financial year are calculated directly from the pay history. However, because of payday filing, IRD will have received the pay details of all previous pays, so the year-to-date totals are not essential. Without the full history, the YTD totals on the payslips will only show the totals since you started processing pays in Payroll Pro, so you would need to let your employees know this. The totals will start from zero in the subsequent financial year, so this is only an issue until then.
Otherwise, it is important to enter any history now, before processing pays. The year-to-date (YTD) totals for the IRD financial year are calculated directly from the pay history. However, because of payday filing, IRD will have received the pay details of all previous pays, so the year-to-date totals are not essential. Without the full history, the YTD totals on the payslips will only show the totals since you started processing pays in Payroll Pro, so you would need to let your employees know this. The totals will start from zero in the subsequent financial year, so this is only an issue until then.
For an employee with an existing history, the most important information is the gross pay for average earnings for holiday pay and/or various other leave including sick leave. For holiday pay, this will be used to calculate the average weekly earnings over the past 52 weeks. Although, this is only important for permanent employees getting four (or more) weeks of annual leave per year, and not required for casuals who are paid 8% of their gross earnings in holiday pay. For sick leave (and bereavement leave, public holidays, and various other leave types) an employee is paid an amount equal to what they would have received had they worked that day. If that is not able to be determined, the average daily pay over the past 12 months is needed.
Pay History Setup Wizard
This is the quickest way to enter the initial figures into the pay history.
Click ![]() which you will find under the grid.
which you will find under the grid.
The following shows an example where the last pay period ended on 9/11/2025, with a payment date of 11/11/2025. If the pay history is only for the purposes of average earnings for leave, the payment date can be set to be the same as the period end date to simplify the process. The dates will default to the currently entered pay period end date, minus one pay period length.
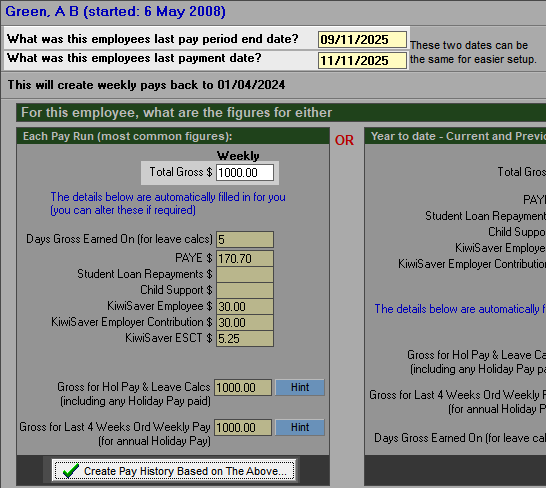
In the Total Gross box, enter the most common gross amount over the past year as this will reduce work in the next steps. After this is entered, Payroll Pro will attempt to calculate the deductions and other figures as shown above for each pay. These can be altered now if required, but can also be altered on a pay by pay basis in the following steps.
Click the button Create Pay History Based on the Above.
A spreadsheet-type form will now be displayed in which you can make alterations to the amounts in individual pay periods. If you decide you want to do something differently, you can click the button << Go Back and Start Again. Continuing with the example, you might decide to zero out the PAYE and KiwiSaver figures.
To edit this the simplest case is to treat the Gross Ord as the total gross (so not worry about the overtime field), and to change this accordingly. The Gross/H and Gross/owp fields (used for average earnings) are unlikely to be different, and these will change as well. If you will need average daily pay calculated for the employee for the purposes of average daily pay for sick leave and other relevant leave, change the Days also.
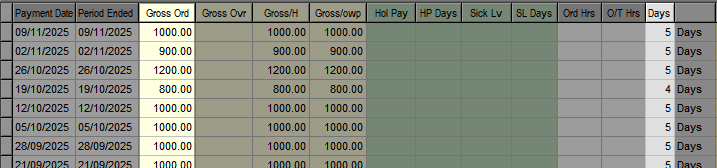
Other options are available, such as "Fine Detail" but in many cases can be ignored.
![]() If you want to delete the history entries before a particular date, you can do so as follows. This saves you having to set up figures which are not essential. It may even pay to do this before the edits above!
If you want to delete the history entries before a particular date, you can do so as follows. This saves you having to set up figures which are not essential. It may even pay to do this before the edits above!
OPTION 1 - delete each line individually
This is the tidiest option, but takes a bit longer.
Click the line you want to delete, then click Delete Line.
Answer Yes to the confirmation prompt. You can do this quickly by pressing "Y" on your keyboard.
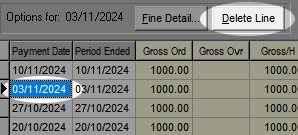
The next line will now be highlighted, so if your mouse pointer is still over Delete Line, just click then press "Y", and continue to the end.
![]() Be careful - when you delete the last line, the later line (one that you want to keep) will be highlighted, so don't click Delete Line at that point! Although you can add back individual lines.
Be careful - when you delete the last line, the later line (one that you want to keep) will be highlighted, so don't click Delete Line at that point! Although you can add back individual lines.
OPTION 2 - Clear a line and copy down
Click the line you don't want, then delete or zero the figures for that line.
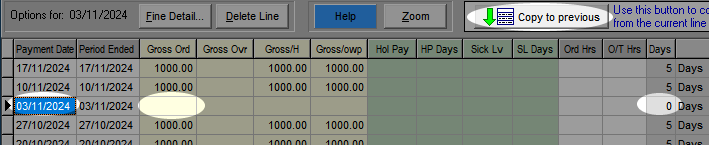
Then click Copy to previous, and all the zero's will be copied down.
FINAL STEP
Click the button that says Click here when finished.
You will now see the pay history filled in.
The YTD totals will also have been calculated automatically.
Holiday Pay
![]()
IMPORTANT: The balance information you enter here provides a starting point for Payroll Pro, and thereafter the figures are maintained by Payroll Pro as pay runs are completed. The information entered here to initially define the employees current entitlements should be very accurate, however, it can be edited at a later time should an error in initial data entry be discovered.
1. Choose the method.
For example, for casual employees % of Gross Only is used, and for permanent employees Calculate Days (and Weeks) is used. These examples assume holiday pay in days - if you are using hours, then the word "Hours" will appear instead of "Days".
METHOD: % of Gross Only
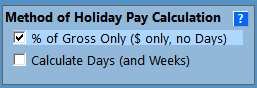
For the first option, it is simply a matter of forcing the balance to be the current balance in dollars. In a pay-as-you-go situation, the balance should be zero, so enter zero into all the fields. In any other case where the balance is not zero, just enter it into the Hol B/fd field.
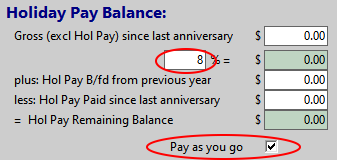
![]() Remember to set the percentage, and click Pay as you go if applicable.
Remember to set the percentage, and click Pay as you go if applicable.
METHOD: Calculate Days (and Weeks)
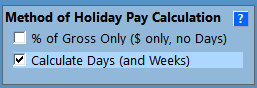
The important results here are:
a. Correctly define a week of holiday pay. This will be in the employment contract.
b. Ensure the starting balance is correct.
c. Ensure the figures for termination payment are correct.
Start by using the Setup Wizard. Click the button ![]()
Then, on the following, tick both of the option boxes.
Enter the information in the highlighted boxes below.
The definition of a week of holidays will depend on your employment agreement. In a case where a week is not determined, the minimum days (or hours) are a good starting point, but this must be agreed with the employee. For example, if an employee's contract says they work a minimum of 3 days a week, but they often work 4 or 5 days, setting the week as 3 days is a good choice. As per the Holidays Act, the average earnings over the past 52 weeks will ensure the employee gets the higher rate for any holidays taken, and therefore a week of holidays will be at the correct amount.
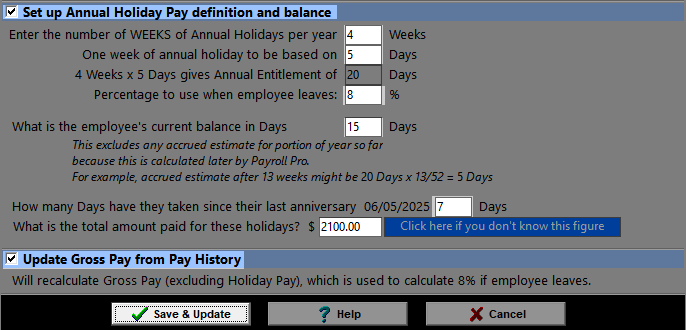
When you click Save and Update, you will find the fields are filled in for you.
How the balance is made up is not as important as the balance itself, so in the above example, the important thing is that the balance shows 15 days. If you do wish to change any of the figures, you can do so. Usually, you would change these fields using the green Edit Annual Holiday Pay button, as this provides some guidance. However, as we have just set the figures up, this adds unnecessary details, so the best option here is as follows:
a. click in one of the greyed out fields - let's say B/fd from previous years.
b. a confirmation prompt will appear twice - answer Yes both times.
c. the grey boxes will now turn white and you can make adjustments.
If anything goes wrong, you can go back to ![]() and start again.
and start again.
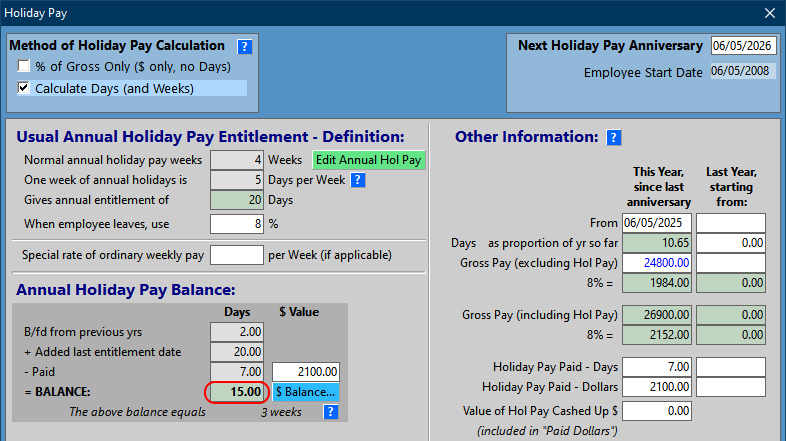
What are those two columns on the right?
The far right hand side column (Last year, starting from) is only of any consequence when common cut-off date is used, and the employee has only passed the first cut-off of their employment. In that case, the date in that column will be the employee's start date, the days will be the annual entitlement (e.g. 20 days in this example) times the percentage of the year employed, and the Gross Pay excluding Holiday Pay will be the amount paid from the start up to that date.
The other column, This Year, since last anniversary, is primarily to enable the calculation of 8% of gross pay should the employee finish employment before their next anniversary. In the above example, if the employee finished employment right now, they would receive the 15 days balance at the value prescribed by the Holiday Act, plus 8% of that value. Let's say each day is worth $300, then they would receive $4,500 plus $460 for those days. On top of this, they would receive $2152, which is 8% of all other gross pay since their last anniversary date. You can have a look at the Holidays Act, in particular, Sections 24 to 26 here for more information.
Sick Leave, and Other Leave
![]()
This information is relatively self-explanatory. Enter the figures so that the starting balances are correct. If Sick Leave is in hours, ensure the entitlement and maximum balance are equivalent to at least 10 days and 20 days respectively, as per the Holidays Act, Sections 65 and 66.
Again, the makeup of the balances is not essential.
How Paid
![]()
As cheques are no longer used, and cash is rarely used, the main point of this section is to set up one or more bank accounts for the employee.
Ensure Balance is set to Bank.
Click + Add New Account.
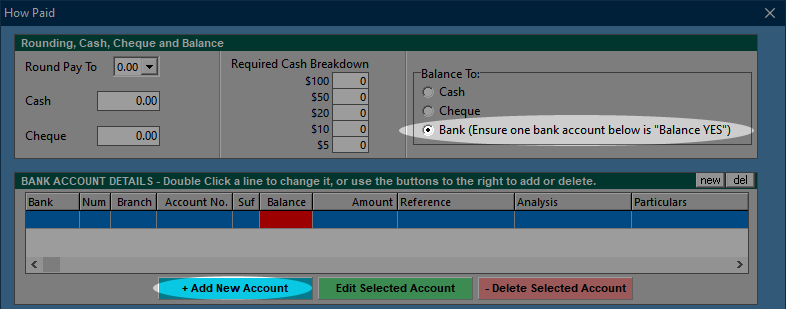
For an employee with a single bank account, enter the account (Num, Branch, Account No and Suf), and tick Balance. The amount will be zero as it is not applicable (all net pay will go into the account).
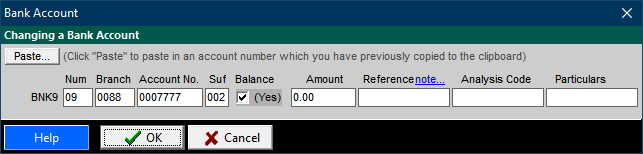
Alternatively, the Paste... button can be used if you have copied a full bank account number to the Windows clipboard. Various formats are accepted (with or without leading zeros), as long as each of the sections is separated with a sash or space. For example, the above result would be achieved with the following (if the account were valid, which it is not)
09-0088-0007777-002
09 0088 0007777 002
9 88 7777 2
For two or more accounts, ensure one of them has the balance option ticked, and the others have the amount to be allocated to that account. For example, if the balance account is 09-0088-0007777-002, but $40 is to go to 09-0088-0007777-050, enter as follows:

Notes
![]()
Three types of notes can be entered:
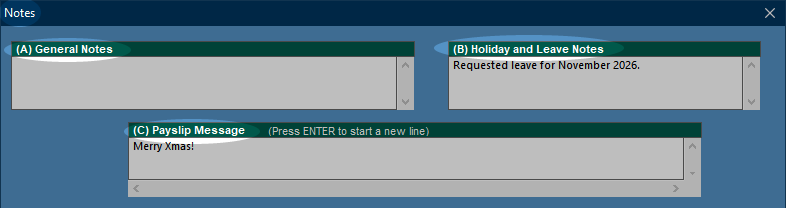
Holiday and Leave Notes can be included in (or excluded from) the Holiday and Leave Records report. The payslip message will appear at the bottom of the employee's payslip. Note that a global payslip message option is also available in "Defaults & Setup", which will automatically fill in this message box for all employees.
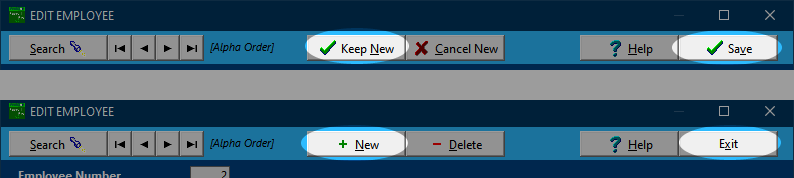
Next Employee, or Finish
When you have finished entering a new employee, you can either click Keep New or Save - both have the same affect.
Then, add another new employee by clicking New, or if you have finished, click Exit.
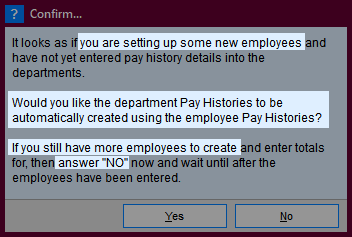
If you do not have any department totals currently, Payroll Pro will ask you if you want to have these calculated from the employee totals. Answer Yes if all employees have been entered, or No if you are coming back to enter some more.
Click here to move to the next section, (which is still under construction, but has some helpful links).
![]()