
Screen shots - IRD Filing (IR348 and IR345)
Step 6:
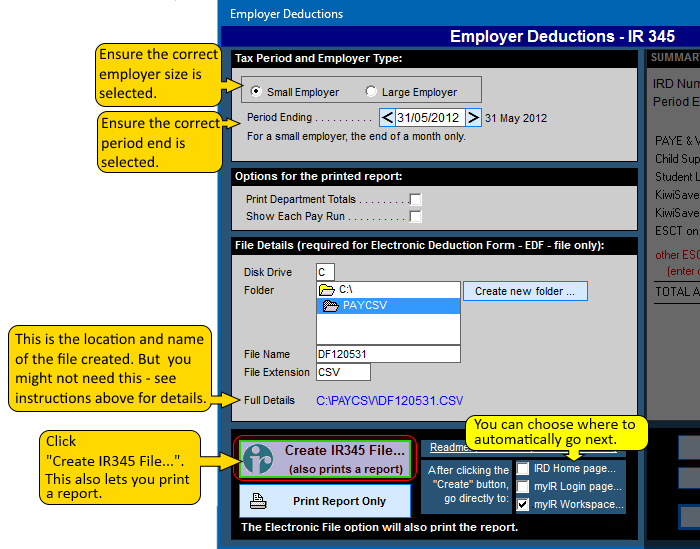
The IR345 (Employer Deduction Totals)
The IR345 contains the ESCT totals which are not available from the IR348. This will not be relevant if you do not have any employees in KiwiSaver - but if you do have any employees in KiwiSaver you will need the ESCT totals.
> Ensure the correct Employer Size is selected
A small employer files the IR345 once per month, but a large employer files the IR345 twice per month.
> Ensure the Period End Date is correct.
For a small employer, this is the end of a month only.
For a large employer, this will be the 15th or end of a month.
> Enter the file details
This lets you choose where the file will be saved. The file name will default to a format of DFyymmdd.csv, which is the date of the period ending for the period being filed. For example for the end of May 2012, the file name is DF120531.CSV.
> You may not necessarily have to upload this file
to the IRDs website if you are a small employer, as the totals from the IR348 will fill in the IR345 boxes for you - EXCEPT for the ESCT total!!. This means that if you do not upload the IR345 file, then you will need to copy the ESCT total from the IR345 report printed from Payroll Pro, into the ESCT box on the IRDs website.
> New option added in 2018:
You can choose to have Payroll Pro send you directly to a page on the IRD website. The options are listed beside the "Create" button. If you experience any problems with this part, you can unselect all of them. It is possible that only the IRD Home Page will be enabled, as IRD is updating some of their webpages, but the Home Page should remain the same. If you are a small employer and only need to file once per month, then you may be able to complete the IR345 without having to upload this. Just make sure you note the ESCT amount.
> Click the button "Create IR345 File..."
This will save the file in the location you selected.
> Report
Make sure you print the report, or at least make a note of the ESCT amount and the TOTAL Amount To Pay. The report contains the information contained in the file including ESCT, and the location of the file.
You can click anywhere on the image below to see the next step. The image below is from Payroll Pro Version 2.48. If you have not already updated, or if you are using Payroll Pro version 1, this will look a little different, but the general idea is the same.
Step-1 Step-2 Step-3 Step-4 Step-5 Step-6 Step-7 Step-8 Step-9 Step-10 Step-11 Step-12 Step-13